Tuning Thorlabs CPS532 Laser Modes
Choosing the right laser for Raman spectroscopy isn’t particularly an easy task. In the past, I initially proposed to use Thorlabs cheap CPS532 laser which has limited spectral performances that limited the spectrometer resolution to 35 cm-1. I also proposed a more performant solution using Thorlabs DJ532 laser diode which could improve the spectrometer resolution to 12 cm-1. However, whereas the CPS532 was an all-in-one module, using the DJ532 required a LD and TEC driver for which you could use either Thorlabs bench solution or a much cheaper custom driver that I built just for OpenRAMAN. And since not everybody is at ease with laser tuning, I also proposed a fiber-coupled laser add-on and a free-space version of the spectrometer using CNI MGL-III-532 laser which increased the setup user-friendliness at the expense of the price.
All these solutions had their own drawbacks: the CPS532 had poor spectral performances, the DJ532 version was either very expensive to assemble or required soldering skills and off the shelves high-performances lasers like the CNI MGL-III-532 are pretty expensive as well. Here, I propose the best of both worlds: using Thorlabs CPS532 to achieve a 12 cm-1 resolution!
In my previous post on laser modes tuning, I have shown how temperature and current change the number and location of lasing modes of the Thorlabs DJ532 laser diode. In that post, we have seen that the proper settings will produce an ultra-narrow single longitudinal lasing mode while improper settings will result in much broader spectra. I then ended the post by showing that heating the CPS532 laser housing with a heat gun will dramatically affect the spectral content of the laser as well, which opened some doors on CPS532 modes tuning.
Since heating your laser with a heat gun is not a very reproducible method, I designed a TEC module to control the laser housing temperature. The assembly is shown in Figure 1 and can be downloaded here.
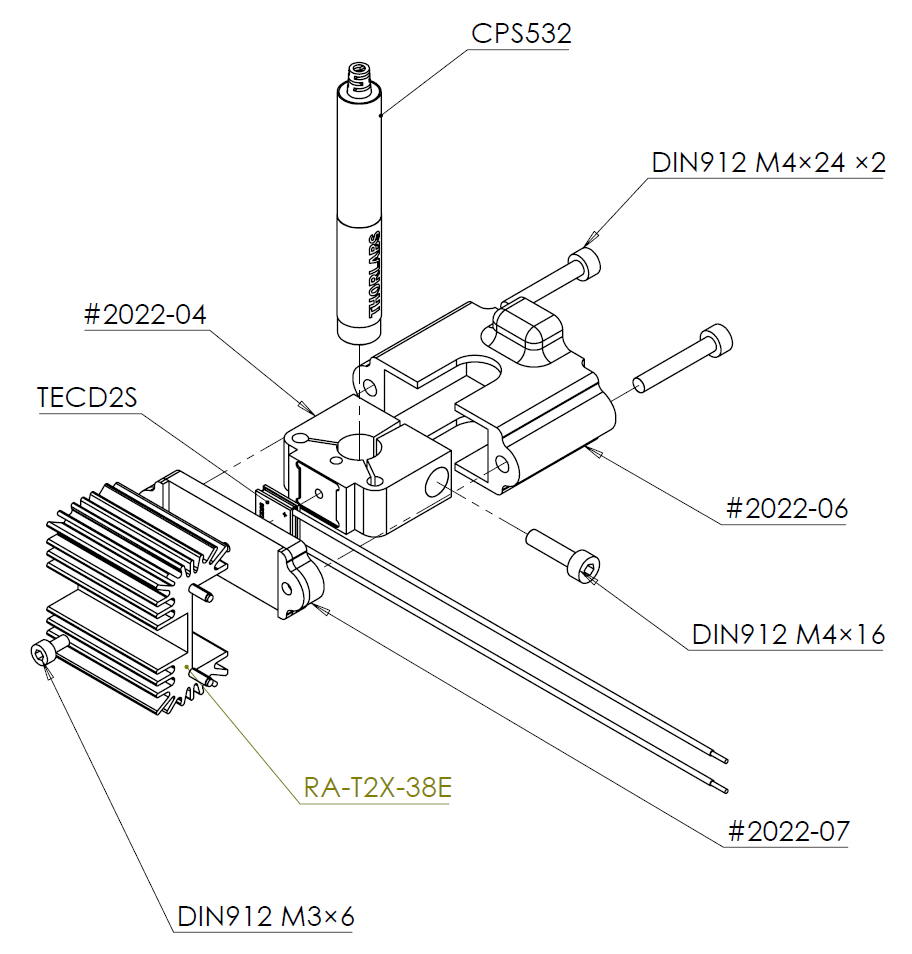
Thermal control of the laser housing is done using Thorlabs TECD2S peltier element but any compatible peltier will do the job as well. The “hot” side of the peltier is cooled by natural convection using a heat sink RA-T2X-38E while the “cold” side is connected to the laser via a custom clamping mechanism that is insulated from natural convection using a 3D part that also keep both the hot and cold side clamped together via plastic screws. I’m putting “hot” and “cold” sides between quotes here because we will mainly use the TEC for heating and not for cooling so the heat sink will actually be the cold part. Thermal paste is applied between all parts to ensure proper thermal contact as usual.
One advantage of using a TEC instead of a resistive heater element to heat the laser is that we can heat and cool with the TEC whereas a resistive element can only heat. This makes a big difference in terms of thermal control. Using a 10 kΩ thermistor, we can control the temperature of the assembly using a PID loop. I have tested this solution successfully at up to 1A driving currents between 15°C and 45°C and the temperature settles to a steady point pretty quickly.
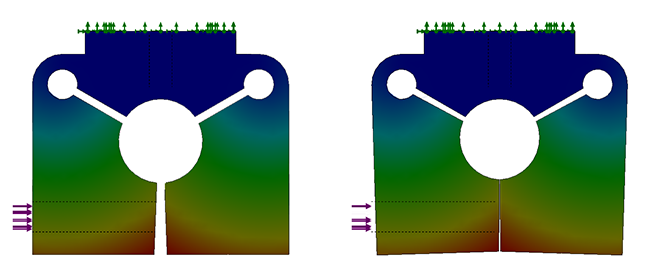
Finally, if the laser clamp has an odd shape, it’s because it is a compliant mechanism designed to provide clean contact between the clamp and the laser housing. The part deformation under (gentle) load is shown in Figure 2. Note how the three sides of the clamp apply a normal contact to the laser housing. This condition is not met with regular one-side-only clamps.
The very first thing I studied was the lasing modes as a function of temperature using my high-resolution spectrometer. The results are shown in Figure 3 with 1°C increments and follow the same convention as in my previous post.
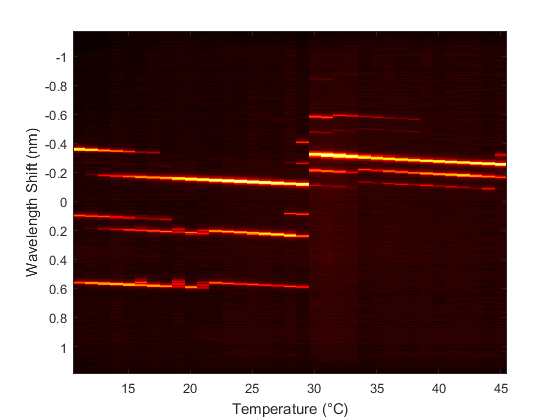
At ambient temperatures between 20°C and 25°C we get three distinct longitudinal modes separated by about 0.8 nm (~28 cm-1). At lower temperatures, other modes appear which increase the spectral broadness of the source to about 1 nm (35 cm-1). This is well in-line with the initial measurements I did years ago with the Starter Edition.
Something interesting appears near 30°C on my laser with an abrupt change in lasing modes. At ~40°C only three modes still exist with a width of about 0.1 nm (3.5 cm-1). Note that this is true for my very own laser and you may get different longitudinal modes with yours.
The overall pattern is stable and I was able to repeat the experiment after 2 months, obtaining the same longitudinal modes distributions. This is a relatively good news because it means that we can use the assembly of Figure 1 in our spectrometer, set a temperature set-point and keep operating at that temperature later.
Finally, I chose to limit my experiment from 11°C to 45°C. I was not able to go below 11°C with 1A of current and using more current resulted in a thermal run-away of the TEC element (it was heating more quickly than what natural convection could remove and the heat from the hot side started leaking to the cold side, rising the overall assembly temperature instead of cooling it). Thorlabs also mentions the temperature range for the CPS532 is 10°C to 40°C (and storage temperature -30°C to +70°C). I chose to go slightly beyond the 40°C limit in the experiment of Figure 3 because operating the laser at 40°C ambient will result in a higher temperature at the laser side due to self-heating. I therefore decided that going to 45°C should be safe enough but if you want to keep your laser warranty, you should stick to the 10°C-40°C range. Also, during actual operations I never went above the 40°C limit as it was not necessary performance-wise.
Now that I had identified the different lasing modes temperature regimes, I mounted the assembly on my OpenRAMAN spectrometer with a 15 µm slit. I took spectra of isopropanol at different temperatures to compare the result.
The cleanest results were obtained at 40°C, as expected from the experiment of Figure 3. The full spectrum is given in Figure 4. Note that the wavenumber scale is not calibrated so you may notice a slight shift in the peak positions compared to published spectra.
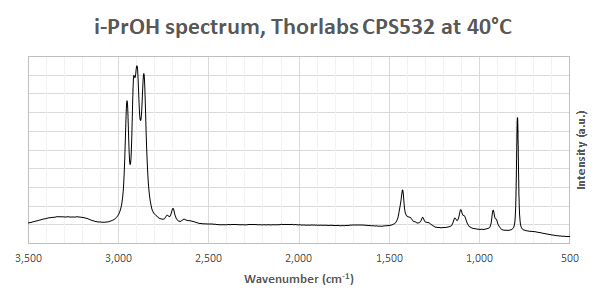
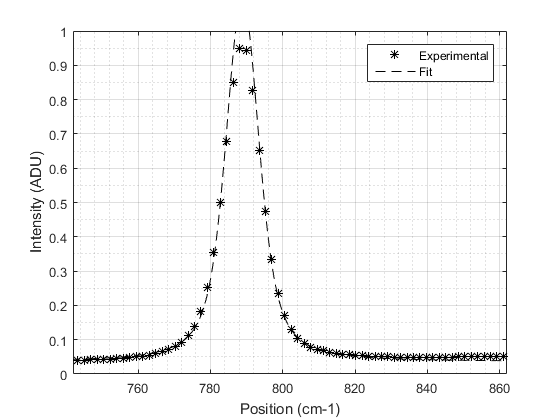
The resolution was evaluated using the FWHM of the peak near 800 cm-1. The result is shown in Figure 5 and is equal to 11 cm-1 which is as good as the Performance Edition.
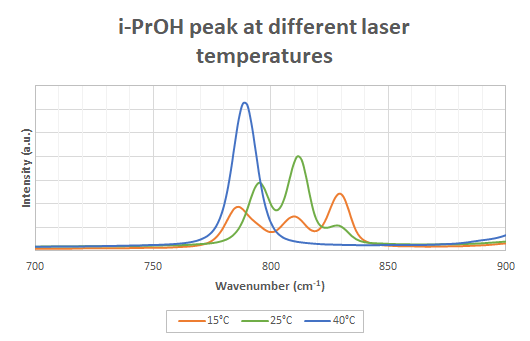
The different longitudinal modes at different temperatures can be clearly observed on the peak near 800 cm-1 as shown in Figure 6. Comparing with Figure 3, we clearly identify the three amplitude-equal modes at 15°C, the two major + one minor modes at 25°C and only one peak at 40°C since the triplet separation is tighter than the OpenRAMAN spectrometer resolution.
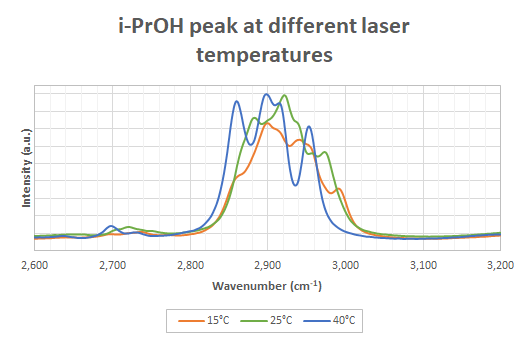
A close-up on the 3,000 cm-1 region is also given in Figure 7. From the SDBS database, we expect four Raman peaks at 2,972 cm-1, 2938 cm-1, 2909 cm-1 and 2,881 cm-1. The four peaks are resolved at 40°C and unresolved at other temperatures. Note that the peak appearing near 2,700 cm-1 at 40°C is actually expected from the SDBS published spectrum although its position is not given on their website.
The overall conclusion is therefore excellent as it was shown to be possible to control the lasing modes of the cheap Thorlabs CPS532 laser in a reliable way to produce spectra that had the same resolution as those of the Performance Edition but at a fraction of the cost! With this add-on, the only remaining difference is the optical power since the CPS532 is limited to 4.5 mW. This is actually both a good and a bad thing at the same time. Teaching applications may probably be best served with a low-powered laser for safety reasons while research applications may require higher power to reach more dilute samples. As an order of magnitude, the spectrum of Figure 4 was obtained using a 10 sec exposure time. The spectrum is still recognizable at 10 Hz by increasing the gain which is important for alignment purposes.
Last but not least, this experiment was entirely funded by our fellow Patreons. A big thanks to all of them for having made this possible! And if you enjoyed today’s post, think about donating like them!
Therefore, big thanks to Naif, Young, Samuel, James, Andrew, Lilith, Hitesh, Sebastian, Jesse, Sivaraman, Jon, Alex, Stephen,Cory, Karel,Themulticaster, Tayyab, Marcel, Kirk and Dennis.
Want to discuss this further? Check out our new community board!