Tooling
Assembly of the spectrometer or the cuvettes will require some generic tooling. It is assumed that you have access to basic mechanical workshop tooling as well such as drill bits, taps, end mills and reamers. These tools are required to finish the 3D printing job so you can operate them with your hands directly and you don’t have to use a lathe or a mill. If you don’t have some of the parts, you can procure them easily at different suppliers for prices between 1-10€ each.
When tapping holes in 3D printed parts, we also recommend using helicoils inserts for all the mounting holes (e.g. baseplate holes). I recommend V-Coil Thread Repair kits for that purpose.
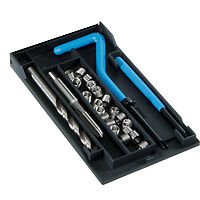
To tap a hole with an helicoil insert in a 3D printed part, first drill the hole to a larger dimension using the drill bit given in the kit. Then tap the hole using the special tap included in the kit. You can then screw the insert in place using the kneed bar. Don’t push the insert into the hole but rather gently screw it in place. The insert should be fully inserted into the hole or you won’t be able to put the screw after. Then use the straight bar to break the insert leg by pushing it through the hole. Once the leg is broken, you will not be able to remove the insert.
We give both drawing PDF and STEP files for the 3D models. Always check the drawings for any feature whose dimension should be controlled or tapped holes. Also, use POLYAMIDE SLS printing technology unless otherwise specified. Do not use FDM printing as it will not work for the application (FDM is the technology used in home 3D printers such as Makerbot or Ultimaker 3D printers).
During assembly, you will also to use a fluocompact lamp to tune the spectral range of your spectrometer. These lamp are readily available at any supermarket. Be sure to buy a fluorescent lamp and not a LED lamp. Its spectrum should look like this:

Alignment of the spectrometer also requires a neon lamp with a resistor such as this one:

The lamps cost about 1€ on e-bay but you will have to choose a correct resistor and plug them to the 220V. This can be a dangerous operation if you do not know what you are doing. Either ask an electrician to help with that or purchase the NE2 calibration lamp from Ocean Optics although it is ridiculously expensive (about 800€).
To assemble the custom LD & TEC driver for the Performance Edition you will also need the MTDEVAL1 evaluation board from Thorlabs to program the MTD415TE chip. The evaluation board costs about 135€ and requires a USB cable and a +12V power supply that is not included.
To assemble your OpenRAMAN spectrometer, you will need some general parts that should be readily available in your optical lab. Check the list to be sure that you have the following elements in sufficient quantities:
Finally, you will also need standard stuff such as nitrile gloves, analytical grade iso-propanol and optical cotton patches to clean the optics. If you are not familiar with cleaning optics, I can recommend this excellent video made by Edmund Optics: