Fiber-Coupled Laser Update
When I first started the OpenRAMAN project there is one word that resonated for me: accessibility. I wanted the project to bring Raman spectroscopy to as many people as possible, and more specifically to those like me who couldn’t afford a commercial instrument.
So it became natural to seek for a low-cost approach at first since I identified the price as the primary reason that was keeping people away from Raman spectroscopy. However, with time, I realized that price alone does not necessarily grant for accessibility.
The Starter Edition seems to be the version that attracted the most attention whereas fewer people have turned to the Performance Edition and the majority of those who did does not operate the low-cost LD driver but the expensive, bulky, COTS drivers of Thorlabs. I believe the reason behind that is the easiness of assembly of the Starter Edition. That would also explain why the people using the Performance Edition mainly choose the COTS drivers, despite the price, since the custom LD driver requires electronic skills to be assembled.
This is a natural consequence of requiring the people to assemble the spectrometer themselves. Things would have probably been different if I had been able to provide off-the-shelves spectrometers. It is nonetheless an important learning I made on the project: there is a right balance to be found between price and easiness of assembly. But not all users are alike and I also realized that every one of them had very specific context and needs. Because of the profusions of context, having high modularity becomes an important factor too in the quest of accessibility.
For that reason, I now propose the possibility to use an external, fiber-coupled, laser. The update also decreases the gap between the Starter and Performance Editions by sharing more parts. You can therefore more easily go from one to the other. You can download all the CAD here.
The modified spectrometer is shown in Figure 1.
However, installing a fiber-coupled laser is not without consequence as it requires more optical parts. First, you need to collimate the light exiting the optical fiber using a lens. Second, you need to filter the light itself. Indeed, as the laser light passes through the optical fiber it produces its own Raman signal! If you inject the signal as-is, you will have a mix of Raman from your sample and Raman from the optical fiber after it experienced normal scattering in your sample.
For those who know me well, they also know that I first strongly advocated against using fiber-coupled lasers in the OpenRAMAN project due to the increased price implied by these two elements (collimator and filter). But today I realize that offering such an add-on fits a middle-ground between the low-cost, difficult to assemble, custom LD driver and the much more expensive COTS driver version of the Performance Edition. It also offers a solution to all the labs who already own suitable lasers for the application, like universities.
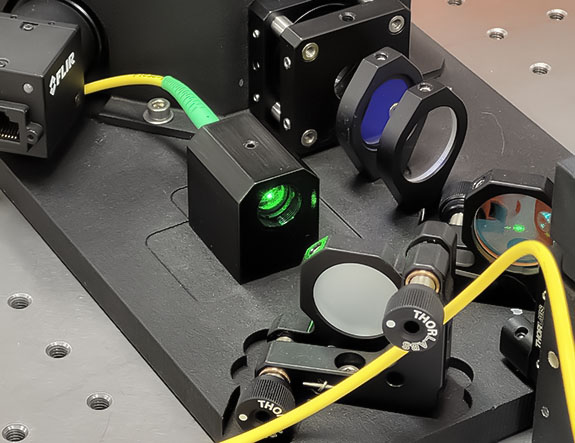
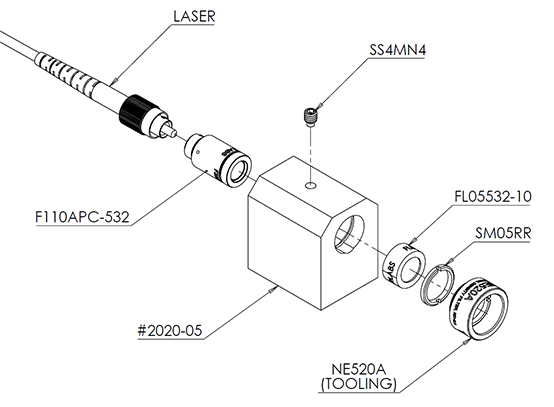
The complete system is shown in Figure 2. It consists of an external, fiber-coupled, laser, a collimator lens (F110APC-532), a filter (FL05532-10) and a neutral density filter (NE520A) in case the laser driver does not offer strong-enough attenuation for the alignment phase. All parts are held together using an update version of our former laser holder part of the Starter Edition. Note that this new part is both compatible with the Performance and Starter Edition.
Let’s dig a bit into the different elements.
The collimation of the laser light from the optical fiber is done through the F110APC-532 collimator. Technically, it only consists of a lens in a stainless steel housing with a fiber connector at the other end. It is a relatively expensive part for what it does but it is also a standard solution for the collimation of fiber-coupled lasers so it’s usually a go-to during concept validation phases. Thorlabs propose the collimators for various wavelengths (here, 532 nm), fiber connector (here, FC/APC) and focal length. If your laser is not FC/APC, select the appropriate connector instead. Concerning the focal length, I selected one that would match the aperture size of the alignment frosted disk and I recommend that you keep the same. There is no adjustment for focus with these collimators but I never felt the need to do so up to now.
The filter was a bit more tricky to select because Thorlabs propose either a 1 nm bandpass or a 10 nm bandpass version. The 10 nm one is less half the price of the 1 nm filter but the blocking optical density is less (~104.5 compared to ~106). Also, the 10 nm filter has 70% transmission at 532 nm whereas the 1 nm filter has only 40% transmission. In the balance, we also need to account for DLMP550 dichroic mirror which will let some of the light pass through instead of being reflected to the sample port.
The responses of the various filters are given in Figure 3 along with the DLMP550 reflectivity.
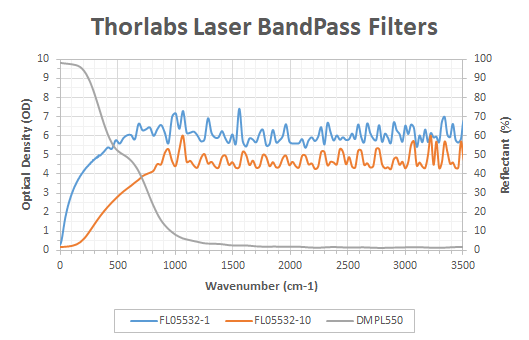
In a commercial Raman spectrometer, we would like to select the sharpest cut-off possible for both the bandpass filters and the dichroic mirror. However, such sharp filters comes at a price roughly equal to the whole OpenRAMAN instrument! Some trade-off is then necessary but the question remains between the FL05532-1 and FL-05532-10 versions.
I chose to go for the 10 nm version mainly for the price and the transmission of laser light (70% vs. 40%). I was a bit afraid concerning the cut-off but I did not notice any leakage signal from the fiber in my experiments up to now.
Concerning the laser, I did all my tests using CNI MLL-U-532-10 laser. It is overkill in terms of price ($3500) and performances (>1 m coherence) but I had one accessible for the tests. Any laser with a linewidth of maximum 0.15 nm (this will translate to <5 cm-1 in our Raman setup) which would have single-mode laser, preferably FC/APC, is suitable for the add-on. In terms of power, it is up to you but I would recommend about 50 mW for equivalent SNR as the original Performance Edition (50 mW × 70% = 35 mW) or 5 mW if you plan to work with students. I can definitively recommend CNI as laser supplier. I have long professional experience with them and they offer excellent price/quality. Be aware however that the laser power is not strictly controlled as we have had laser of more than twice the requested power! I haven’t enquired them for a long time for Raman spectroscopy but a few years ago they quoted $1400 for a 0.1 nm 100 mW laser, single-mode FC/APC with a fixed current driver with TEC control.
Finally, concerning the housing (#2020-05/2 part), it is a refinement of the initial concept of the Starter Edition with a prismatic holder that can accommodate a 11 mm diameter cylinder so it is both compatible with the F110APC-532 collimator and the CPS532 laser from the Starter Edition. While the part can technically be made in SLS printing (provided you rework the front part for the retainer ring thread and eventually check the clearance for the filter), I chose to go for CNC metal machining this time. I sent the parts to XOMETRY who did a nice job for about $120 for two (was almost the same price for just one). If you chose to go the same way, be sure to select the fine grade (ISO 2768 fH) for the filter clearance because the dimensions on the drawing are outside of the standard ISO 2768 mK tolerance.
Now comes the question: who is the update for? Shall we select it as a baseline design or shall we restrict it to some of the users?
The price of the laser & driver of the current baseline of the Performance Edition is about $1000 with the custom driver and $3500 with the COTS drivers. With the new add-on, the price shall be somewhere around $1800 with a laser – a $800 difference with the current baseline but still a saving of $1700+ compared to the COTS drivers. For people already owning compatible lasers, like universities and optical workshops, this brings the price of the Performance Edition to about the one of the Starter Edition as you only need the housing, collimator and filter (+ eventually the neutral density filter).
So, it depends. For those who already own a compatible laser, it’s clearly the way to go. For the others, there is the question of the price and easiness of assembly. I would recommend the current baseline for those who have electronic skills and are not afraid of fine-tuning the laser settings. For those who don’t feel confident in that and planned to use the COTS drivers, then this add-on is again the way to go because it will save them a lot of time and money. Also, commercial lasers are much more easier to operate as you just need to switch their power supply on and you don’t have to handle a laser diode with an ESD mat anymore.
Concerning the performances, I tested the add-on on both the standard cuvette with isopropanol and on the solid cuvette with salicylic acid and got excellent performances with the MLL-U-532-10. I haven’t tested yet with broader line-width lasers but I’m pretty confident that it will work too. That also allowed to validate the solid cuvette for the Performance Edition which was a request I got by email from one of our followers.
That is all for today! October has been an extremely busy month with the FAB17 but the xmass holidays are coming shortly and I will have two weeks to work on my projects and spend time with my family! You can expect a ton of posts in the following weeks 🙂 I would like to give a big thanks to Samuel, Luigi, Arif, Young, James, Mehmet, Lilith, Vaclav, Jesse, Sivaraman, Hitesh, Jon, Themulticaster, Cory, Karel, Kewei and Marcel who have supported this post through Patreon. I also take the occasion to invite you to donate through Patreon, even as little as $1. I cannot stress it more, you can really help me to post more content and make more experiments!
0 Comments